Showing posts with label Lectures. Show all posts

Sunday, 7 August 2016

PHP Introduction - Lecture #19

PHP - DATABASE CONNECTIVITY Contd.

Hello All... welcome every one. I'm going to start PHP lectures for Very Beginners, who wants to learn PHP from very beginning. No matter if you do not have any basic programming concept. If you follow my tutorials I hope you will surely get some how good knowledge of PHP.
Today our Topic is

PHP-DATABASE

Today we will learn about how to fetch record from MySQL and display on browser using SELECT query. As told earlier before performing any action with MySQL you need connection with MySQL at the top of coding even before of HTML coding.
<?php
$conn = mysqli_connect(“localhost”, “root”, “”, “school”) OR die(mysqli_connect_error($conn));
?>
After you have successful connection with MySQL you need to retrieve data from MySQL. How you will retrieve here is the process.
<?php
            $qry = mysqli_query($conn, "SELECT * FROM students");
            if($qry){
                        while($row = mysqli_fetch_array($qry)){
                                    echo $row['student_id'];
                                    echo $row['student_name'];
                                    echo $row['student_address'];
            }
            }
?>

Here is the simple changing after the query is true. After the query is true we have started a while loop and inside that while loop we have given a function mysqli_fetch_array() that will retrieve the information from table and it takes parameter the query above you have initialized and that is stored in a variable called `row` or anything you want. Now the record has been retrieved we just need to echo/display it on browser and to display. Little changing while displaying record we need to echo column names as defined in MySQL table within the brackets and single quotations, along with the variable name in which mysqli_fetch_array is stored. Below is the pictorial view of code and retrieval of records.


I have used <br /> tag to more clarify the records otherwise it may be difficult to understand. Why there has been used While loop not any other because if you remember in previous lectures of loop that While loop works on basis of condition, and if there is no records in table and mysqli_fetch_array will return nothing and 0 will be stored to row variable and 0 means nothing or false. And if while loop becomes 0 or false it will not work further. Further DIE function is used in the connection coding that if connection is not established or not connected properly `OR` statement will be executed, DIE function is used to stop the execution of code, if there is any error in connection only error will be shown on browser no remaining code will be executed not even HTML code.

Thanks Guys. Any thing missing or any question from this topic you can comment below, I will be trying to solve and answer your question.
Our topic continues to `PHP-DATABASE`
Good Luck J

PHP Introduction - Lecture #18

PHP - DATABASE CONNECTIVITY


Hello All... welcome every one. I'm going to start PHP lectures for Very Beginners, who wants to learn PHP from very beginning. No matter if you do not have any basic programming concept. If you follow my tutorials I hope you will surely get some how good knowledge of PHP.
Today our Topic is

PHP-DATABASE

This is very important, very easy topic of this series this PHP-Database is required everywhere you will work for PHP. In this topic we will learn how to send form data to the MySQL server and also how to retrieve data from MySQL. To work with MySQL from PHP we need to connect MySQL with PHP through coding and for that connection we have a function `mysqli_connect` with four mandatory parameters these are `host name, username, password, database name`.
Host name will be localhost, username will be root, password will be left empty and database name will be with which database you want to connect.
 mysqli_connect(“localhost”, “root”, “”, “school”);
and it is good approach to store all these in a variable, school database that we created before, we are going to connect with this database through our PHP coding. And to check either the connection has been established successfully or not. We have another function that is ` mysqli_error() ` this function will tell us the exact error where we have done mistake. Either in host name, user name, password or in database name. And its parameter is taken the variable in which connection is stored. Here is an example through which you can be very clear.
<?php
$conn = mysqli_connect(“localhost”, “root”, “”, “school”) OR (mysqli_error($conn));
?>
If you run this program you will find no error and empty browser nothing to be displayed means connection is successfully established with MySQL in case you made any mistake in host name, user name, password or in database name then it will display what the exact error is. Now we will insert the form data into the MySQL database school that we created previously using PHP. First of all we will create a form
<form action=”#” method = “post”>
Student Name: <input type = “text” name = “student_name” />
Student Address: <input type = “text” name = “student_address” />
<input type = “submit” name = “register” value = “Register” />
</form>
Now PHP coding on the same page because path is `#` if path is other file name then you must create that file with PHP extension and there you must write this code:
<?php
            if(isset($_POST['register'])){
$student_name = $_POST['student_name'];
$student_address = $_POST['student_address'];
$qry = mysqli_query($conn, "INSERT INTO students VALUES(NULL, '$student_name', '$student_address')");
            if($qry){
            echo "inserted";
            }
            else{
echo mysqli_error($conn);
}
}
?>
When you execute this code only form fields will be shown and no any action of PHP coding will be executed because whatever we have written is under the block of IF condition, when button will be clicked following code will be executed. After that we have kept values of form fields in variables and through those variables we have inserted records in MySQL. mysqli_query() is a function that helps us to execute a query and it accepts two parameters one is connection link of database and other is SQL query. And whenever you are going to insert any string values try to give single quotation as we have given. And in last we are checking that if query has been executed successfully with no errors then there should print “inserted” otherwise show us an error where we have made a mistake. Below is the whole accurate coding of inserting form record. Remember to include connection whenever you are going to work with database at the top of your coding.

<?php
$conn = mysqli_connect("localhost", "root", "", "school") or die(mysqli_connect_error($conn));
?>

<form action="#" method="post">
Student Name: <input type="text" name="student_name"/>
<br>
Student Address: <input type="text" name="student_address"/>
<br>
<input type="submit" name="register" value="Register"/>
</form>
<?php
            if(isset($_POST['register'])){
$student_name = $_POST['student_name'];
$student_address = $_POST['student_address'];
$qry = mysqli_query($conn, "INSERT INTO students VALUES(NULL, '$student_name', '$student_address')");
            if($qry){
            echo "inserted";
            }
            else{
echo mysqli_error($conn);
}
}
?>

In INSERT query if you do not give column names and directly use VALUES then it will also work but values should be accurate and sequential as given in MySQL table. You can see pictorial view of coding and result below:


In the last third picture inserted is displayed means record has been successfully inserted according to condition applied in coding.
One thing I missed to inform you that here we have two form fields and in MySQL we had three columns one column is missing and that is student_id, if you remembered student_id column was AUTO INCREMENT, in case of AUTO INCREMENT if you don’t insert record MySQL will auto insert values itself. But in PHP coding while executing the query you need to put ‘NULL’ or empty quotation ‘’.

Thanks Guys. Any thing missing or any question from this topic you can comment below, I will be trying to solve and answer your question.
Our topic continues to `PHP-DATABASE`
Good Luck J

PHP Introduction - Lecture #17

PHP - USER INTERFACE

Hello All... welcome every one. I'm going to start PHP lectures for Very Beginners, who wants to learn PHP from very beginning. No matter if you do not have any basic programming concept. If you follow my tutorials I hope you will surely get some how good knowledge of PHP.
Today our Topic is
USER INTERFACE (UI)
User interface is like a link between a computer and user that let’s user know how to use a system without getting confused about its usage. It allows user and the system to communicate with each other. User Interface (UI) controls how the instructions are entered as input into the system and how the system presents the information on the screen as output.
There are two types of User Interface.
i.                    Command Driven Interface (CDI)
ii.                  Graphical User Interface (GUI)
CDI is text-based interface where user types commands through keyboard. All the previous work of MySQL that is the clear example of CDI. Where we had to type commands and find the results.
GUI is type of interface that allows user to control computer’s inputs, storage and output through graphical elements. In GUI we do not need to type any of the command you can control your commands via user interface.
The main purpose of adding this topic into the lectures is that whatever we have done using MySQL console all that we can de using a GUI based tool, where we do not need any type of commands to be written, just control our requirement using graphical elements.


phpMyAdmin is the best GUI option for organizing and managing our MySQL databases. It’s very easy to understand and easy to use. This tool comes along with wamp/xampp server when you install any of these. Here is how you can open phpMyAdmin.
For wamp user: just click on the green icon of the wamp server, you will find
phpMyAdmin and click on that. As shown in image.


Following are the steps of how you will create tables and insert records in your tables shown via images hope you will surely get the concept about how you can use phpMyAdmin.
After you created the database, you need to create the table and number of fields/columns you want to have in it.


When you click on go a table named students will be created with 3 number of columns. After that you will be asked to enter name of columns with some other information as shown in figure:


Here are the three columns that we were asked previously while creating a table in image there are the column names student_id with type integer, student_name and student_address with type varchar. Length of fields is also required to give for VARCHAR maximum length is 255 and usually this length is given but if you don’t give length to any Integer value by default it will take 11. As student_id is always taken as an Integer type of value and it is important to check the auto increment option as circled in above image. After that when you filled these important requirement click Save button at the bottom or if you want to add one more column you can click on Go button.

When you click on Save button, below given window will appear, that will ask you to insert values in those columns.


As shown in image if you leave empty to student_id that was done auto increment previously MySQL will automatic insert values that will start from 1. As you can see there are two buttons Go. If you click on first button only one value will be inserted if you click on second button both of the values will be inserted. After clicking the button if you click on browse option at the top of screen, you will find both of records that were inserted. As shown below.


If you want to insert more records you can insert by clicking on the insert option and it will start with the same process of inserting record. And more you can edit and also delete your record as mentioned in image. These were the main and important tasks that are necessary for using phpMyAdmin. Further you can try by yourself for more actions and if you got any questions of confusions feel free to ask here.

Thanks Guys. Any thing missing or any question from this topic you can comment below, I will be trying to solve and answer your question.
Our next topic will be `PHP-DATABASE`
Good Luck J

PHP Introduction - Lecture #16

PHP - FORMS

Hello All... welcome every one. I'm going to start PHP lectures for Very Beginners, who wants to learn PHP from very beginning. No matter if you do not have any basic programming concept. If you follow my tutorials I hope you will surely get some how good knowledge of PHP.
Today our Topic is
PHP-FORMS
Forms are used to send/receive data from one page to another or even from one server to other server using user input. Today we will learn how to send data from one page to another and saving record from PHP-forms to MySQL server. There are two main methods / ways through form data can be sent and received.
i.                    GET Method ($_GET)
ii.                  POST Method ($_POST)
Both of these are also called as Global Variables. Global variables means they can be accessed from multiple pages. Whenever we are sending our form data using GET method means all the sent data will be shown in URL of browser and it can be easily viewed by your neighbors. So it’s required to not to use GET method whenever you are going to send your critical information like passwords, credit card number, cnic number etc.
And when you have a critical information you are required to send your data using POST method, as it is more secure and the data will not be shown in the URL.
How we send our form data let’s look for an example. Hope that you are familiar with forms and form elements.
<form action = “#” method = “get”>
<input type = “text” name = “first_name” />
<input type = “password” name = “password” />
<input type = “submit” name = “submit” />
</form>
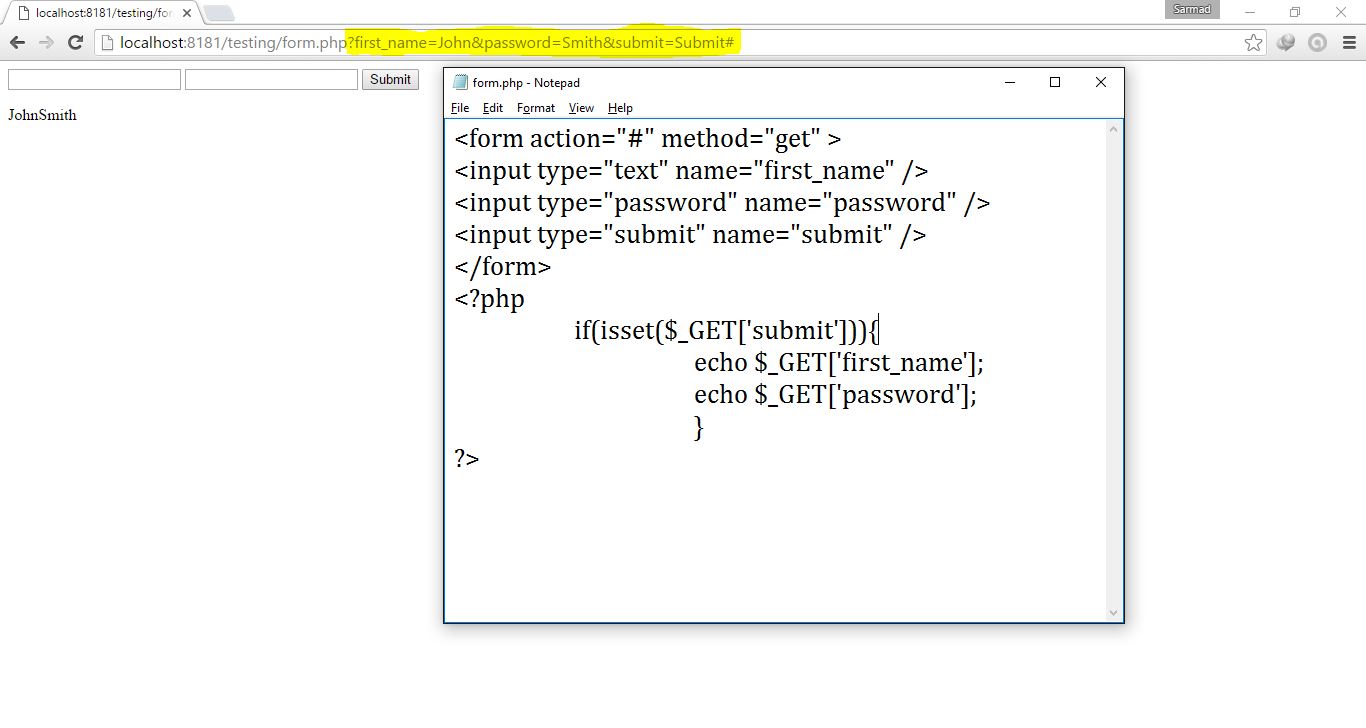
action means where we are going to send our form data. # means at the same page and the method we have used is get. It’s important to assign name to each of these form elements as data will be received by their names. When you fill these text fields and click the submit button means data we are sending to the same page and it should be shown on the same page. Above we have sent our data and how to receive that data is described below.
<?php
            If(isset($_GET[‘submit’])){
            echo “<br />”;
            echo $_GET[‘name’];
            echo $_GET[‘password’];
}
?>
If you run this code you will find result as shown in figure.


As you can see this is submitted form and what the data was filled is shown at the same page but it is also shown on the URL as mentioned. Your name, password and everything you will be going to send your critical information will be visible to everyone. This is the main disadvantage of sending your data using GET method.
Coming to PHP code first of all we are checking that either the form is submitted or not if form is submitted then below code will run otherwise that code will not work. And it’s mandatory to use if condition whenever you are going to send/receive any form data. `isset` function is used to check either the submit button is clicked or not, its argument is name of button what is assigned in HTML code with what method data is sent with that same method. After that if we want to echo value of form elements we will call with the name of that element along with method.
Remember to write this html and php code on the same page if path of action in the form attribute is same and save it with .php extension. You can write PHP and HTML code on different pages you just give path of other file in the form attribute.
Now we will be sending our data using POST method.
Whole process is same as that of GET method but where we used GET will be replaced by POST.

<form action="#" method="post" >
<input type="text" name="first_name" />
<input type="password" name="password" />
<input type="submit" name="submit" />
</form>

<?php
            if(isset($_POST['submit'])){
                        echo $_POST['first_name'];
                        echo $_POST['password'];
                        }
?>
The result is shown in figure.


No data is shown in URL, and no one can look at your privacy whatever you filled in form will not be visible to anyone. This is the main and important advantage of using POST method.
Hope you got the concept about GET/POST methods further you try yourself by submitting forms at different pages with multiple form fields.

Thanks Guys. Any thing missing or any question from this topic you can comment below, I will be trying to solve and answer your question.
Our next topic will be `User Interface`
Good Luck J


PHP Introduction - Lecture #15

INTRODUCTION TO DATABASE Contd.

Hello All... welcome every one. I'm going to start PHP lectures for Very Beginners, who wants to learn PHP from very beginning. No matter if you do not have any basic programming concept. If you follow my tutorials I hope you will surely get some how good knowledge of PHP.
Today our Topic is
CREATING AND ALTERING DATABASE
Till now whatever we have we have performed operation were on the built-in databases. Today we will create our own database and perform operations on our own made database. To create database we have a command CREATE DATABASE after that write name of database. Just simple here is an example:

CREATE DATABASE school;

This will create database named school. Further to create tables and place columns in this table first write CREATE TABLE command followed by name of table start opening braces inside these braces write the column name along with its datatype. As written below here is the query to create tables.

CREATE TABLE students(
student_id INT NOT NULL);

NOT NULL is an optional. If you want that a particular column should not be left empty then you are required to write NOT NULL. This query will create a table namely students, with column student_id. Now if you want to see structure of this table you can write desc query.
desc students;
You will find the structure of table students. And if you want to add multiple columns you can use `ALTER` command. Let’s have look:

ALTER TABLE students
ADD student_name VARCHAR (255);

By writing this query in MySQL console and hit enter means you are going to add a column namely student_name that is of varchar type and its length is 255 characters. And again if you `desc students` the same table you will find an extra column that would surely be added in that table. And if you want to add multiple columns at a time just place comma ` , ` before the end of braces and start another column. here is an example.

CREATE TABLE students(
student_id INT NOT NULL,
student_name VARCHAR (255) NOT NULL,
student_address VARCHAR (255) NOT NULL,
student_contact VARCHAR (255) NOT NULL);

If you want to add another table in the same database you follow the same steps of creating a table.
And if you want to delete any of those columns here is the query

ALTER TABLE students
DROP COLUMN address;

This will drop / delete the column address.
So if you want to drop the table instead of single column use DROP TABLE and table_name. Eg. DROP TABLE students
It will delete the whole table all the data/columns inside that table.
To delete the whole database similarly you can use DROP command followed by database name. Eg. DROP DATABASE school
This will delete the database, inside that database whole tables, inside that tables the whole columns and all the record inside that columns. Try to avoid of using the DROP DATABASE command because it can surely cause some serious issue if you have any critical database. If you want to use it then best approach is to create another database where you can apply all your operations for your testing purpose.
Apply Primary key constraint to the column. Here is an example

ALTER TABLE students
ADD PRIMARY KEY (student_id);

Through this query Primary key constraint will be applied to the student_id column. Remember to apply PK constraint only to that column that cannot be the same just like id, cnic number, passport number etc.. No two columns can be Primary Key from a single table and no two records of Primary Key column can be same.
Now I’m going to insert records in our table.
INSERT INTO students(student_id, student_name) VALUES (01, “John Smith”);
Description of above query:
`INSERT INTO` is a keyword and compulsory for inserting any record to any table after that give table name start braces and start writing column names. It’s compulsory to write as it the spelling and sequence of columns of table as described in table. After that write `VALUES` keyword means these are the values that to be stored in table. Same here the values should be according to the sequence, means first column is student_id and that is INT means in first column only numeric value will be stored, and so on.
And if you want to insert multiple values at a time just little extension in query.
INSERT INTO students(student_id, student_name) VALUES (02, “Catherine Mills”), (03, “Kate Williamsons”); 
and hit enter you will find two records have been inserted at a time, if more than two records instead of semi colon put comma and start braces and in last put semi colon.
Further learning about MySQL. If you mistakenly filled the wrong information you can update that record even after it’s saved in database. Here is the syntax of query:

UPDATE table_name
SET column_name = “VALUE”
WHERE column_name = condition

UPDATE students
SET student_name = “Jack Smith”
WHERE student_id = 1;

It’s very important to apply where condition in update query, applying where condition means pointing out a particular record from set of records. This query says that UPDATE students table and SET student_name to “Jack Smith” whose student_id is 1.
Caution: If you don’t use where condition student_name of all records will be saved to “Jack Smith” and once a query is executed it will never be undo again so it’s mandatory to apply where condition while updating a record.

Thanks Guys. Any thing missing or any question from this topic you can comment below, I will be trying to solve and answer your question.
Our next topic will be `PHP-Forms`
Good Luck J

PHP Introduction - Lecture #14

INTRODUCTION TO DATABASE Contd.

Hello All... welcome every one. I'm going to start PHP lectures for Very Beginners, who wants to learn PHP from very beginning. No matter if you do not have any basic programming concept. If you follow my tutorials I hope you will surely get some how good knowledge of PHP.
Today our Topic is
DATABASE- SQL CONSTRAINTS
A constraint is simply a rule, or condition that is applied on a column or multiple columns in a table. Following are some of the important constraint that are briefly discussed.

  ð Null Constraint: By default a column contains NULL values. Null means empty or nothing. Whenever there is Null constraint in a column means that column can hold no value or that column can be left empty.

  ð Not Null Constraint: Not null constraint forces a column not to left empty cell or no any column can have 0 value. Any column with Not Null constraint must contain a value.

  ð Unique Constraint (UC): This constraint enforces that no two rows can have same value in a specified column. Each value that is filled in a rows must be unique.

  ð Primary Key Constraint (PK): More similar to Unique constraint but unique constraint can be applied on multiple columns but Primary key constraint can only be applied on a single column within a table. Primary key cannot contain null values, cannot hold same values. PK uniquely identifies a record and its best approach to have Primary Key in each table so that record can easily be fetched.

  ð Default Constraint (DC): Default value is specified when w user does not enter any value within a column then Default value should be saved by using Default clause.

  ð Foreign Key Constraint (FK): Foreign key is formed when we have a relationship between two tables via a single common column and that common column is usually the Primary Key of one table and that same column is the Foreign Key in other table. Let suppose we have two table of Teachers and Departments and each record of teacher and department is differentiated by Primary Key in each table. What could be the relation between these two that if we want to display those teachers who are in the same department then surely we have relationship between these two tables. In order to get those teachers we will have a column as Primary Key in Department Table and Foreign Key in Teachers table.

How will you apply these constraints to the columns will be told in next lecture for now I think you all got the concept about `Database Constraints`.

Thanks Guys. Any thing missing or any question from this topic you can comment below, I will be trying to solve and answer your question.
Our topic continues to `Database`
Good Luck J

PHP Introduction Lecture #13

INTRODUCTION TO DATABASE Contd.

Hello All... welcome every one. I'm going to start PHP lectures for Very Beginners, who wants to learn PHP from very beginning. No matter if you do not have any basic programming concept. If you follow my tutorials I hope you will surely get some how good knowledge of PHP.
Today our Topic is
DATABASE
From the previous lecture you learnt how to display all records and also particular columns from a table. Now today we are going to make an increment in `SELECT` statement, if we want to display a single record from a column not the whole column, just small increment in `SELECT` query. Include `WHERE` condition, just like this:
Here is the syntax:
SELECT (requirement) => FROM (table) => WHERE (condition)
SELECT * FROM user
WHERE id = 5;
It will display all the records whose id is 5. Instead of `id` you can write any column name within a table.
E.g. SELECT * FROM students
WHERE name = “John”;
It will display all the records whose name is “John”.

ð Selecting all teachers whose salary is greater than 15000:
SELECT * FROM teachers
WHERE salary >= 15000;

ð Select all the records from employees who work at night shift and salary is 10000: 
SELECT * FROM employees
WHERE shift = “night” AND salary = 15000;

ð Selecting all employees whose salary is between 15000-20000:
SELECT * FROM employees
WHERE salary BETWEEN 15000 AND 20000

ð Selecting all the teachers who teaches either IT, SW or CS:
SELECT * FROM teachers
WHERE subject IN(IT, SW, CS);

ð Selecting all the employees whose name starts with `A`:
SELECT * FROM employees
WHERE name LIKE “A%”;
`A%` shows that first letter should start with A after that any other letter. Similarly you can search all records whose name ends with `A`. just make small change in `Where` statement
WHERE name LIKE “%A”;

These were main and important queries used with SELECT statement. I hope you all got the concept. Further you must practice yourself. In coming lecture we will be learning about `Database Constraints`.
Thanks Guys. Any thing missing or any question from this topic you can comment below, I will be trying to solve and answer your question.
Our topic continues to `Database`
Good Luck J

PHP Introduction Lecture #12

INTRODUCTION TO DATABASE

Hello All... welcome every one. I'm going to start PHP lectures for Very Beginners, who wants to learn PHP from very beginning. No matter if you do not have any basic programming concept. If you follow my tutorials I hope you will surely get some how good knowledge of PHP.
Today our Topic is
DATABASE
First of all let’s have some introduction of database after that we’ll be doing PHP-Database examples.
Database is the computerized collection of records stored in the form of rows and columns. Why computerized because in terms of manual file management system a computerized database is more easier in searching, managing, updating the records. The main purpose of database is not only to collect and organize data but allows the advanced retrieval of data and analysis.
To retrieve, update or insert the records from bunch of information from we use Database Query.


MySQL (Structured Query Language) is very popular, free, open source database that handles very large amount of databases. With very fast performance, easy to use with PHP and its Shell Prompt for creating and updating the records. This comes with your server whatever you have wamp/xampp. Here is how you can open the Shell Prompt of wamp server.
You just click on the green icon of wamp server, hover mouse at the MySQL option and click on MySQL console as shown in figure.


When you click on MySQL Console option another window will appear that will be asking for password, just leave it empty and press Enter. After pressing the Enter you will find another window like that


Now we are connected to MySQL. Here we can write our queries. Some of the short and practice based queries are listed below you must try this for your easiness in understanding and make command on coming up next queries.
i-                   SELECT VERSION(): Will show the latest version of your MySQL.
ii-                 SELECT CURRENT_DATE; Will show the current date with month and year.
iii-               SELECT NOW(): will show the current date and time.
You can also write mathematical expressions in MySQL console.
iv-               SELECT PI(): will return value of pi.
v-                 SELECT 5*4+2: will return the answer of expression
And so on…
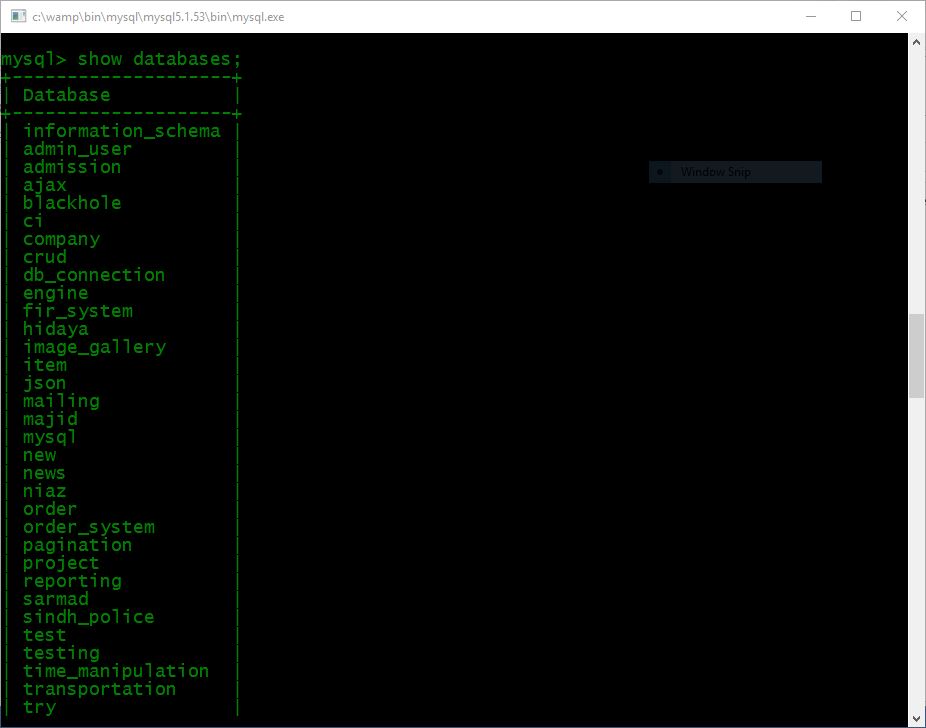
Now come to our Database related MySQL queries. When you install any of server wamp/xampp there will be some of the built-in databases to list out those databases there is simple query that is `show databases` followed by semicolon and hit enter you will find all of your databases in your server. Remember to give semicolon after each query you enter otherwise the query will not work and MySQL will be forcing you to enter even more because terminator will be missing. When you see list of your databases and if you want to access any one of them you will write query `use database_name`. Let suppose you have a database named test then you should write `use test`. After writing then command you will be using test database. And if you want to see the tables in that database simple you write `show tables` you will be shown all the tables within that database. And not yet if you want to see columns and other information of any table you just write `desc table_name`. Let suppose in test database there is table named `user` then you will write `desc user` you will see all the columns and other information about that table. In last if you want to see the records of that tables you will write that query.
SELECT * FROM table_name
* means all. Above query says that display all the records from a table.
Let’s see pictorially what have been told in description.
First of all `show databases` command. These are all my databases that I have created are shown in figure, even some are missing will be shown in next picture.


After that `use database`, `show tables` and `desc table` commands are here shown in this image.


Field means Column. id, name, password, role_id are the columns of user table. Type means which kind of information is in this column or which type of information it can store. int means only integer type of data/numeric data. varchar means integer as well string information both can be stored and the number within curly braces tells the length of value. Null Yes/No says that value of that column could be null or not. If there is NO means value could not be Null or empty. Where there is Yes means value of that column can be Null or left empty. Remaining about Key and, default and Extra you will be told later, for now you should have basic knowledge of basic queries and their work.
And if we want to see the full record of any table as query is told above, here is the graphical representation of how record is displayed along with their values.


And if you want any particular record from this table not the whole record you write any column names separated by commas instead of * sign. Let’s have a query.
SELECT name, password FROM user;
Will display just name and password column values not the whole.
For today’s lecture I think this is enough for you, hope you got the concept about database, MySQL console and database queries. You must practice yourself for further your clearance.

Thanks Guys. Any thing missing or any question from this topic you can comment below, I will be trying to solve and answer your question.
Our topic continues to `Database`
Good Luck J